How to Repair Your Laptop Keyboard at Home
Keys fail often. It happens without warning.
A single crumb can ruin your typing experience or stop a key from registering entirely. You might notice a stuck key, an unresponsive membrane, or multiple keys typing the same character due to a controller short. This guide covers how to fix these issues manually before you decide on a full replacement.
Don't panic yet. Most problems are mechanical.
Diagnosing the Failure
First, identify the specific fault. If one key feels mushy, it is likely debris. When multiple keys fail in a straight line or a cluster, that usually points to a damaged ribbon cable or an internal short circuit on the membrane layer itself. We don't guess here; we test.
Go to keyboard-test.space immediately. Use this online tool to map out exactly which inputs are failing or ghosting during your typing tests. If you see random characters appearing, your controller is likely struggling with a short. This often happens after a liquid spill, even if the spill was months ago.
Check for physical obstructions. A tiny piece of grit can prevent the silicone dome from making contact with the PCB. It's simple physics.
The Quick Fix Sequence
Start with a safe cleaning routine. First, shut down the laptop and unplug the power adapter to avoid any electrical shorts while working. Turn the laptop upside down over a clean surface or a trash bin. Use compressed air between the keys to blow out loose particles that might be lodged in the tight gaps of the chassis.
If a key is still physically sticking, use 90% isopropyl rubbing alcohol. Apply a tiny amount to a cotton swab and rub it around the edges of the offending keycap. Press the key repeatedly to work the liquid into the mechanism; this helps dissolve sugary residue from soda or coffee spills that might be acting like glue.
Do not soak the board. Excessive liquid will kill the laptop faster than a crumb ever could.
Removing Keycaps and Scissor Mechanisms
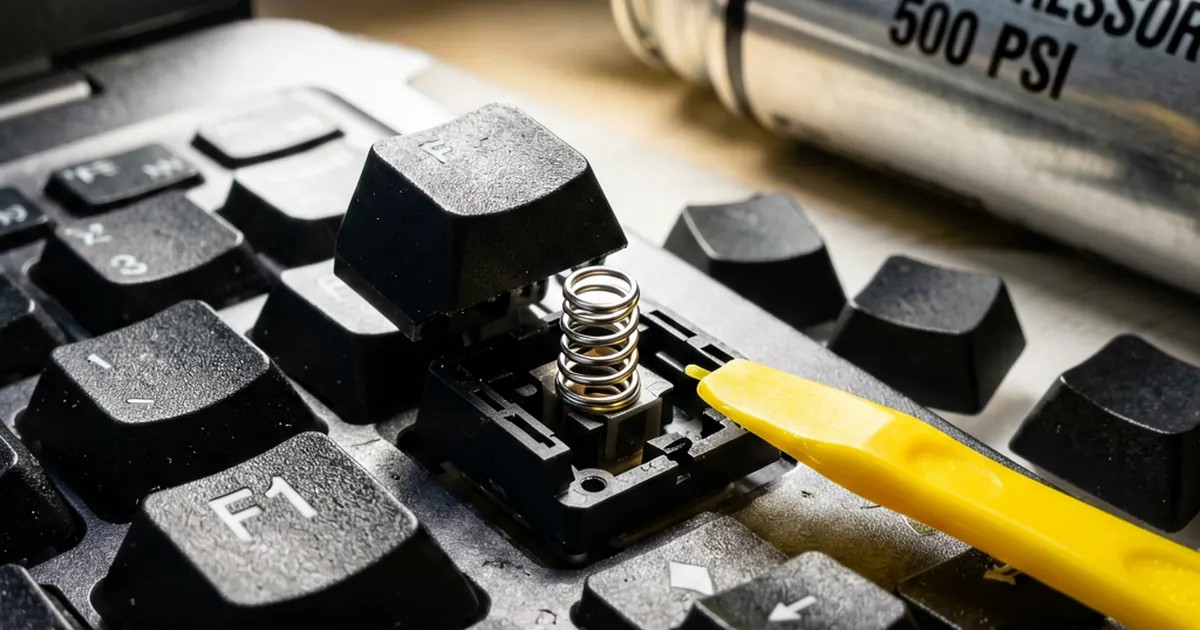
Sometimes cleaning isn't enough. You may need to remove the keycap to reach the source of the problem. Use a plastic spudger or a very thin flathead screwdriver to gently pry the cap from the top edge. Lift vertically; do not rotate the tool as you pull, or you will snap the delicate plastic clips underneath.
Look closely at the scissor mechanism. These are two small plastic frames that clip together to provide stability and tactile feedback. They are surprisingly easy to re-seat after cleaning if you are careful with your fingers. If you break one of these tiny tabs, the keycap will never sit flat again, and you might need a ORIGINAL New Toshiba Satellite M200 US Keyboard White replacement instead.
Be extremely gentle. These parts are brittle.
Replacing the Entire Keyboard Unit
If cleaning fails, you must replace the module. This process varies by model but generally involves removing the screws securing the keyboard tray from the underside or the top bezel. For some older machines, like those using a Toshiba Satellite P10 Series P20 Series P25 Series P30 Series Keyboard, the process is relatively straightforward and takes about fifteen minutes.
The most critical step involves the ribbon cable. You must lift the dark lock bar on the connector first to release the tension before sliding the cable out. When installing your new Dell Inspiron 1540 1545 laptop Keyboard Black US, ensure the cable is inserted fully into the socket. Push the lock bar down until it sits completely flush with the connector housing. A partial insert will result in dead keys or intermittent connections that drive technicians crazy.
Check your alignment. If the ribbon is crooked, the connection will fail under pressure.
When to Stop Repairing
Know your limits. Some modern ultrabooks have keyboards that are riveted directly into the palm rest assembly. In those specific cases, you cannot replace just the keyboard; you must replace the entire top case of the laptop. If you see silver rivets holding the keyboard down, stop what you are doing immediately.
If your device is an older workhorse, like a machine requiring a Brand New HP Pavilion DV9000 DV9400 DV9500 Laptop Keyboard, you have a much higher chance of success with a modular swap. For Dell users, sourcing a Replacement Keyboard For Dell G1272 is usually the most cost-effective way to restore functionality without buying a new machine.
It's better to replace than to break. A broken plastic clip can turn a simple repair into a total hardware failure.
Once everything is reassembled, run your tests again. Use the same online tester from earlier to ensure every single key registers correctly under pressure. If you find any remaining dead zones, double-check that the ribbon cable hasn't wiggled loose during the final screw tightening process.
Frequently Asked Questions
How do I know if I need a new keyboard or just a cleaning?
If a key is physically hard to press, it is likely debris that can be cleaned. If the key works physically but nothing happens on screen, it is likely a membrane or controller failure requiring replacement.
Can I use water to clean my keyboard?
No. Never use water. Use only high-percentage isopropyl rubbing alcohol for cleaning sticky residues, as it evaporates quickly and is safer for electronics.
What happens if I don't push the ribbon cable in all the way?
A partial insert will cause certain keys to stop working entirely or cause the keyboard to behave erratically. Ensure the lock bar is flush against the cable.